> ## Documentation Index
> Fetch the complete documentation index at: https://developers.firmly.ai/llms.txt
> Use this file to discover all available pages before exploring further.
# Verify a Domain
> Register and prove ownership of an email domain so it can be bound to an SSO Identity Provider.
**SSO and enforcement are scoped per email domain.** Before you can bind an Identity Provider to a domain or enforce SSO on it, you must register the domain in firmly Connect and prove ownership by publishing a DNS TXT record at its apex.
## Why verification is required
Single Sign-On in firmly Connect is keyed to email domains. Each domain you register is independent — you can bind different Identity Providers to different domains, and enforce SSO on some domains while leaving others on OTP or magic-link login.
Before any of that, firmly needs to confirm that you actually control the domain. Domain verification ensures that no one can hijack the SSO flow for a domain they don't own. An unverified domain can exist in the dashboard, but it **cannot** be bound to an IdP and the **SSO Enforced** toggle is unavailable.
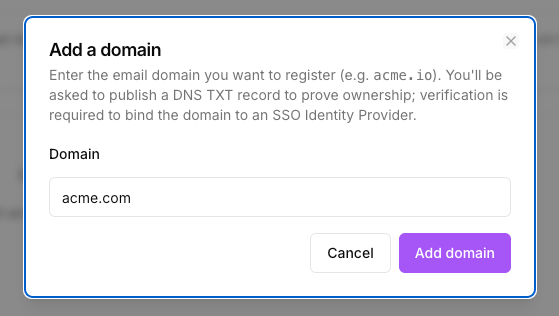
## Add a domain
Navigate to the **Domains** page in your firmly Connect Dashboard settings.
A dialog appears prompting for the domain name.
Enter the bare domain only (for example, `acme.com` — not `https://acme.com` or `mail.acme.com`).
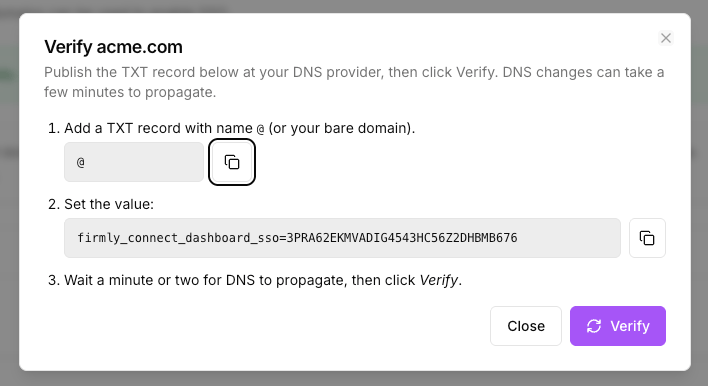
The dashboard immediately opens a **Setup instructions** dialog containing the TXT host, value, and a copy button. Keep this dialog open while you publish the record.
 ## Publish the DNS TXT record
In your DNS provider's control panel, create a new TXT record on the apex of the domain you registered, using the values from the **Setup instructions** dialog.
| Field | Value |
| --------------- | ------------------------------------------------------------------------------------------------ |
| **Host / Name** | `@` (the apex of the domain — some DNS UIs accept the bare domain instead) |
| **Type** | `TXT` |
| **Value** | `firmly_connect_dashboard_sso=` — the unique token shown in the Setup instructions dialog |
| **TTL** | Use your DNS provider's default |
The TXT record value must contain the **entire** string, including the `firmly_connect_dashboard_sso=` prefix. Do not paste only the token portion — verification will fail.
## Publish the DNS TXT record
In your DNS provider's control panel, create a new TXT record on the apex of the domain you registered, using the values from the **Setup instructions** dialog.
| Field | Value |
| --------------- | ------------------------------------------------------------------------------------------------ |
| **Host / Name** | `@` (the apex of the domain — some DNS UIs accept the bare domain instead) |
| **Type** | `TXT` |
| **Value** | `firmly_connect_dashboard_sso=` — the unique token shown in the Setup instructions dialog |
| **TTL** | Use your DNS provider's default |
The TXT record value must contain the **entire** string, including the `firmly_connect_dashboard_sso=` prefix. Do not paste only the token portion — verification will fail.
 ## Verify ownership
Run `dig TXT yourdomain.com +short` (or `nslookup -q=txt yourdomain.com` on Windows) from a terminal, or use your DNS provider's lookup tool. You should see the `firmly_connect_dashboard_sso=...` value returned.
On the **Setup instructions** dialog — or from the Actions menu on the domain row — click **Verify now**. firmly performs a DNS lookup of the TXT record at the apex of the domain.
On success, the domain row shows a green **Verified** badge. The domain is now eligible to be bound to an IdP and to have enforcement enabled.
**DNS propagation** can take anywhere from a few minutes to several hours, depending on your provider and the previous TTL. If verification fails, wait a few minutes and try again. Confirming the record with `dig` (or your provider's lookup tool) before clicking **Verify now** avoids unnecessary failures.
**Rate limits** apply to verification attempts, both per domain and per source IP. If you hit the limit you'll see a "too many attempts" message — wait roughly a minute before retrying.
## What you can do once verified
A verified domain unlocks two capabilities:
* **Bind to an Identity Provider** — the domain becomes selectable in the **Authorized Domains** section of any OIDC or SAML IdP configuration. See the [Generic OIDC](/firmly-connect/sso/generic-oidc) and [Generic SAML](/firmly-connect/sso/generic-saml) guides.
* **Enforce SSO** — the **SSO Enforced** toggle on the domain row becomes available, but only after at least one *enabled* IdP is bound to the domain.
## Enforce SSO for the domain
Once a domain is verified **and** bound to at least one enabled Identity Provider, the **SSO Enforced** toggle on the Domains table becomes interactive. The toggle's tooltip tells you exactly which gating condition (if any) is preventing it from being enabled:
* **Toggle is enabled and on** — *"SSO is enforced for this domain — every user must use SSO."*
* **Toggle is enabled and off** — *"When on, every user on this domain must log in via SSO. OTP and magic link login are blocked — no bypass."*
* **Toggle is greyed out, domain not verified** — *"Verify the domain before enforcing SSO."*
* **Toggle is greyed out, no enabled IdP bound** — *"Bind this domain to an enabled Identity Provider (on the SSO page) before enforcing SSO."*
**Enforcement takes effect immediately.** The moment the **SSO Enforced** toggle is on, OTP and magic-link login stop working for every user with an email on this domain — there is no grace period and no bypass. Always run a successful **Test Connection** on your IdP, and complete at least one real SSO sign-in, *before* enabling enforcement.
To step back from enforcement without losing any configuration, you have two options:
* **Toggle SSO Enforced off** on the domain row — users on that domain regain OTP / magic-link login.
* **Disable the IdP** by turning its **Enabled** toggle off on the SSO page — this turns enforcement off everywhere the IdP is bound, while preserving all configuration values.
## Removing or re-verifying a domain
Deleting a domain from the Domains table removes it from any IdP bindings and is recorded in your audit log. There is no time-based re-verification — once a domain is verified it stays verified for the lifetime of its presence in firmly Connect, until you delete it.
If you need to move a domain to a different organization in firmly Connect, delete it from the source organization first, then add and re-verify it in the target organization.
## Next steps
Set up an OpenID Connect Identity Provider and bind it to your verified domain.
Set up a SAML 2.0 Identity Provider and bind it to your verified domain.
## Verify ownership
Run `dig TXT yourdomain.com +short` (or `nslookup -q=txt yourdomain.com` on Windows) from a terminal, or use your DNS provider's lookup tool. You should see the `firmly_connect_dashboard_sso=...` value returned.
On the **Setup instructions** dialog — or from the Actions menu on the domain row — click **Verify now**. firmly performs a DNS lookup of the TXT record at the apex of the domain.
On success, the domain row shows a green **Verified** badge. The domain is now eligible to be bound to an IdP and to have enforcement enabled.
**DNS propagation** can take anywhere from a few minutes to several hours, depending on your provider and the previous TTL. If verification fails, wait a few minutes and try again. Confirming the record with `dig` (or your provider's lookup tool) before clicking **Verify now** avoids unnecessary failures.
**Rate limits** apply to verification attempts, both per domain and per source IP. If you hit the limit you'll see a "too many attempts" message — wait roughly a minute before retrying.
## What you can do once verified
A verified domain unlocks two capabilities:
* **Bind to an Identity Provider** — the domain becomes selectable in the **Authorized Domains** section of any OIDC or SAML IdP configuration. See the [Generic OIDC](/firmly-connect/sso/generic-oidc) and [Generic SAML](/firmly-connect/sso/generic-saml) guides.
* **Enforce SSO** — the **SSO Enforced** toggle on the domain row becomes available, but only after at least one *enabled* IdP is bound to the domain.
## Enforce SSO for the domain
Once a domain is verified **and** bound to at least one enabled Identity Provider, the **SSO Enforced** toggle on the Domains table becomes interactive. The toggle's tooltip tells you exactly which gating condition (if any) is preventing it from being enabled:
* **Toggle is enabled and on** — *"SSO is enforced for this domain — every user must use SSO."*
* **Toggle is enabled and off** — *"When on, every user on this domain must log in via SSO. OTP and magic link login are blocked — no bypass."*
* **Toggle is greyed out, domain not verified** — *"Verify the domain before enforcing SSO."*
* **Toggle is greyed out, no enabled IdP bound** — *"Bind this domain to an enabled Identity Provider (on the SSO page) before enforcing SSO."*
**Enforcement takes effect immediately.** The moment the **SSO Enforced** toggle is on, OTP and magic-link login stop working for every user with an email on this domain — there is no grace period and no bypass. Always run a successful **Test Connection** on your IdP, and complete at least one real SSO sign-in, *before* enabling enforcement.
To step back from enforcement without losing any configuration, you have two options:
* **Toggle SSO Enforced off** on the domain row — users on that domain regain OTP / magic-link login.
* **Disable the IdP** by turning its **Enabled** toggle off on the SSO page — this turns enforcement off everywhere the IdP is bound, while preserving all configuration values.
## Removing or re-verifying a domain
Deleting a domain from the Domains table removes it from any IdP bindings and is recorded in your audit log. There is no time-based re-verification — once a domain is verified it stays verified for the lifetime of its presence in firmly Connect, until you delete it.
If you need to move a domain to a different organization in firmly Connect, delete it from the source organization first, then add and re-verify it in the target organization.
## Next steps
Set up an OpenID Connect Identity Provider and bind it to your verified domain.
Set up a SAML 2.0 Identity Provider and bind it to your verified domain.