
Onboarding walkthrough
Merchant onboarding is a 7-step wizard inside Firmly Connect, in the same order for every merchant (the CDN whitelisting task is conditional — it’s shown only when it applies; see Task 6). This page walks through the journey from sign-up to go-live: the task table shows who does each step, and the sections that follow cover each one in detail. For the canonical Firmly Connect documentation see Onboarding wizard.
Sign up and verify your email
Onboarding begins at
merchant.firmly.ai. Enter your store URL and a work email on the same domain, add a few contact details, and continue. Firmly emails a verification code to confirm the address; entering it creates your account and drops you into the task wizard.

The 7 tasks at a glance
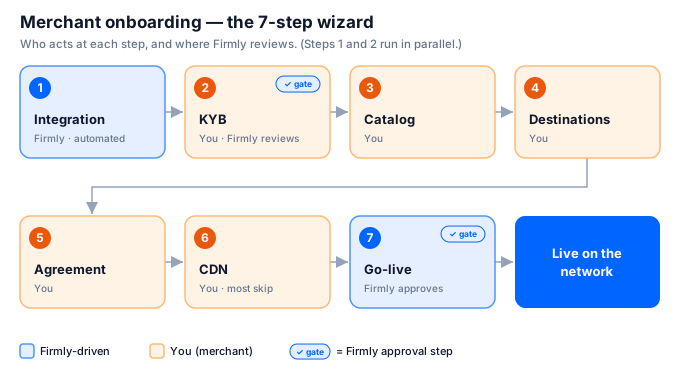
| # | Task | Who does it | Type |
|---|---|---|---|
| 1 | Complete integration | Firmly | Automated |
| 2 | Know Your Business (KYB) | Merchant | Form submission for Firmly review |
| 3 | Configure product catalog | Merchant | Radio button |
| 4 | Configure destinations | Merchant | Toggles |
| 5 | Sign merchant agreement | Merchant | Form + click-through signature |
| 6 | Complete CDN whitelisting | Merchant | CDN dashboard configuration (most merchants don’t need it) |
| 7 | Go-live approval | Firmly | Firmly review and approve |
What the wizard looks like
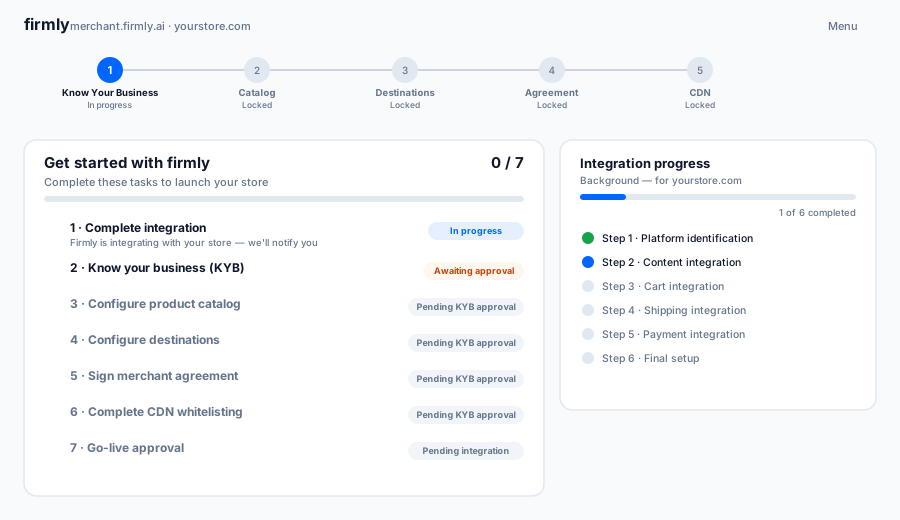
The task menu is your home base until you go live: a progress rail across the top for the five stages you action (the five merchant-actioned tasks; the two Firmly-driven ones don’t appear on the rail), the full seven-task checklist with each task’s status, and — while Firmly connects to your store — an Integration progress panel tracking the background work.
Task 1 — Complete integration (Firmly-driven)
Firmly’s integration systems connect to your commerce backend automatically. This task appears in the wizard list for visibility, but there’s no “Start” button for you to click. Firmly handles the platform integration on its side based on the store URL you provided at signup. For most industry-standard platforms this connects through the same public storefront APIs your own website’s front end already calls — you don’t hand Firmly an admin token, app key, or long-lived secret (see Credentials & API Access). You don’t have to wait for it — integration runs in the background while you complete KYB, and only needs to be finished by go-live.
If you’re on a custom or in-house stack, Firmly may reach out for the specific connection details it needs.
You can follow the connection in the wizard’s Integration progress panel. It runs through six stages — platform identification, content, cart, shipping, payment, and final setup — marking each done as Firmly completes it. Nothing here needs action from you; it’s there so you can see how far along the connection is.
Task 2 — Know Your Business (KYB)
This is your first substantive task. The KYB form is the Company Info tab on the general settings page.
Required fields:
- Company Name
- Online Revenue band
Recommended:
- Employee count
- Headquarters address (Street / City / State / Postal / Country)
- Brand identity (Display Name, primary color, action color, logo)
- Privacy policy URL
- Terms of use URL
Once filled in and saved, a Submit for Review button appears. Pressing it transitions KYB to pending. Firmly reviews and either approves (you’re unblocked) or rejects with notes shown inline. Because KYB gates Tasks 3–6, it’s on the critical path — the expected review turnaround is communicated during onboarding and confirmed during KYB, so you know when to expect a decision rather than waiting in the dark.
See KYB for the full feature documentation.
Task 3 — Configure product catalog
Once KYB is approved, the catalog task unlocks. Pick one mode:
| Mode | When to pick |
|---|---|
| Entire Catalog (Recommended) | Sell all products. New products auto-sync. Inventory updates in real time. Fastest to launch |
| Selected Products (Subset) (Advanced) | A curated set of categories or individual products. Firmly’s team helps scope the selection |
The default is Entire Catalog. Save advances the wizard.
A separate read-only Products view shows what Firmly has ingested from your commerce backend — your confirmation that integration is working.
See Catalog configuration for details.
Task 4 — Configure destinations
Opt into the destinations on Firmly’s network you want to sell through. Each destination is a single toggle in a table grouped by category (AI Shopping Agents & LLMs, Marketplace, Publishers, Social, Other).
During onboarding this is just an opt-in step — flip on the destinations you want. Per-destination performance (orders and average order value for your store) shows later in the Merchant Portal, once you’re live and transacting.
There’s no per-destination configuration form — Firmly handles every behind-the-scenes integration step with the destination platform.
See Destinations configuration for details.
Task 5 — Sign merchant agreement
Review the agreement PDF and fill out the participation form:
- Company Legal Name
- Signer Name, Title, Email, Phone
- “I have read and accept the terms” checkbox
Most fields are pre-filled from your KYB details, so you just review and confirm. Signing captures audit metadata (signer email, timestamp, client location, agreement version, and signing browser).
See Agreement signing for details.
Task 6 — Complete CDN whitelisting (most merchants don’t need it)
If your CDN or WAF blocks Firmly traffic, you must configure an allow rule. Use Web Bot Auth when your edge can verify FirmlyAI Bot. Otherwise, use a merchant-specific header rule. Use IP allowlisting only when request-level identity is not available.
Most merchants don’t need this step. Firmly decides whether it applies during setup based on your commerce platform; when it’s not needed, it’s skipped automatically. If it does apply, it appears as a task in your wizard — you won’t have to discover it yourself — and the go-live review double-checks it.
See CDN whitelisting for the methods, setup steps, and current egress addresses.
Task 7 — Go-live approval (Firmly-driven)
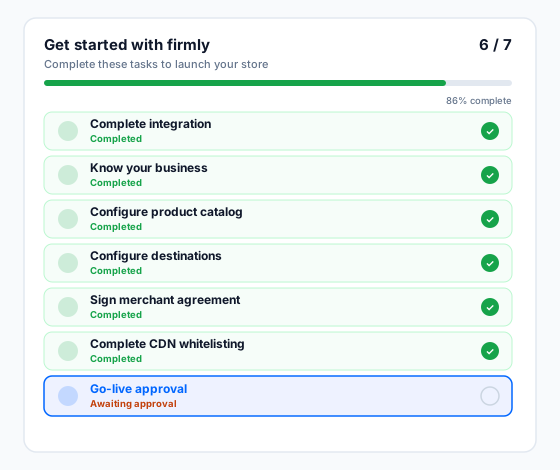
Once your tasks are complete and Firmly has finished its side of the integration, you press “Submit for Go-Live”. That moves the task to Awaiting approval, and Firmly’s review team verifies your configuration and either:
- Approves — you’re live; the Merchant Portal flips from the task menu to the dashboard
- Rejects — the rejection notes are surfaced inline so you know exactly what to fix
The expected go-live review turnaround is communicated during onboarding, so a merchant sitting at Awaiting approval can tell a normal wait from a stalled one.
After go-live
After go-live, the wizard disappears and every step becomes a settings page you can reopen anytime — to widen your catalog, re-sign a new agreement, change which destinations you sell through, or update CDN rules.
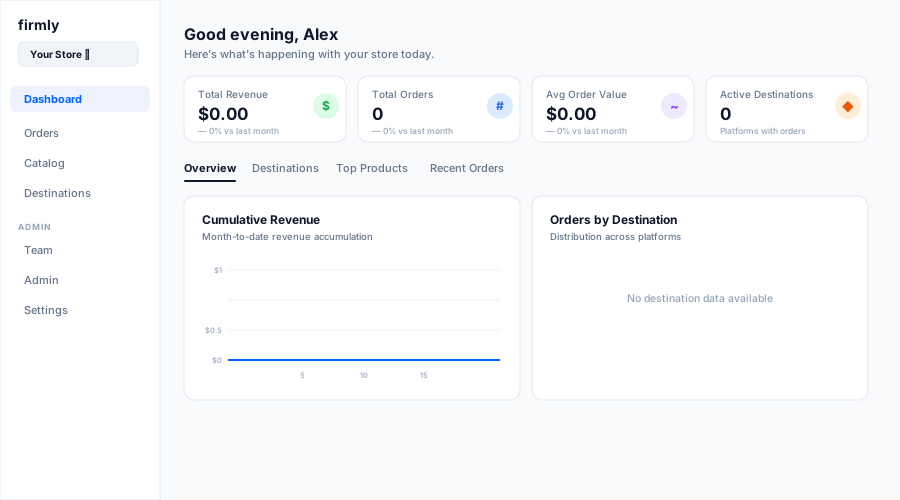
Your home base is now the Merchant Portal dashboard: revenue, orders, average order value, and active destinations across the top, with revenue and per-destination breakdowns below. A brand-new store starts at zero — the numbers fill in as agents start transacting.
Related
- Firmly Connect Onboarding Wizard — canonical reference
- Quickstart — the abbreviated path
- Going live — Firmly’s go-live approval step in depth