
Verify a Domain
Why verification is required
Single Sign-On in Firmly Connect is keyed to email domains. Each domain you register is independent — you can bind different Identity Providers to different domains, and enforce SSO on some domains while leaving others on OTP or magic-link login.
Before any of that, Firmly needs to confirm that you actually control the domain. Domain verification ensures that no one can hijack the SSO flow for a domain they don’t own. An unverified domain can exist in the dashboard, but it cannot be bound to an IdP and the SSO Enforced toggle is unavailable.
Register the bare email domain your team’s addresses use. If your users sign in with addresses on a subdomain (for example @corp.yourstore.example), register that exact subdomain as its own domain — a verified apex domain does not automatically cover subdomain email addresses.
Add a domain
Open Settings → Domains
Navigate to the Domains page in your Merchant Portal settings.
Click Add domain
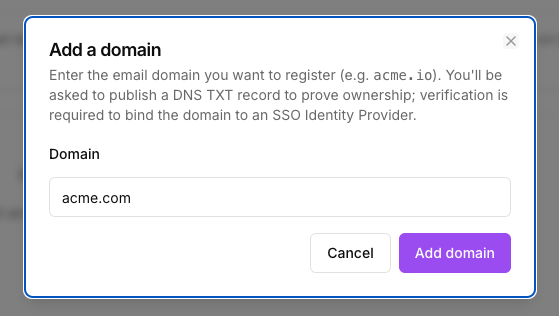
A dialog appears prompting for the domain name.
Enter the email domain and submit
Enter the bare domain only (for example, yourstore.example — not https://yourstore.example or mail.yourstore.example).
Copy the DNS TXT details
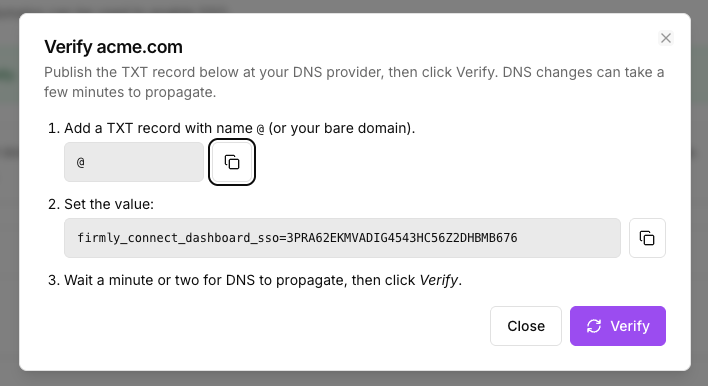
The dashboard immediately opens a Setup instructions dialog containing the TXT host, value, and a copy button. Keep this dialog open while you publish the record.
Publish the DNS TXT record
In your DNS provider’s control panel, create a new TXT record on the apex of the domain you registered, using the values from the Setup instructions dialog.
| Field | Value |
|---|---|
| Host / Name | @ (the apex of the domain — some DNS UIs accept the bare domain instead) |
| Type | TXT |
| Value | firmly_connect_dashboard_sso=<TOKEN> — the unique token shown in the Setup instructions dialog |
| TTL | Use your DNS provider’s default |
Verify ownership
Confirm the record is live (optional but recommended)
Run dig TXT yourstore.example +short (or nslookup -q=txt yourstore.example on Windows) from a terminal, or use your DNS provider’s lookup tool. You should see the firmly_connect_dashboard_sso=... value returned.
Click Verify now
On the Setup instructions dialog — or from the Actions menu on the domain row — click Verify now. Firmly performs a DNS lookup of the TXT record at the apex of the domain.
Watch for the Verified badge
On success, the domain row shows a green Verified badge. The domain is now eligible to be bound to an IdP and to have enforcement enabled.
What you can do once verified
A verified domain unlocks two capabilities:
- Bind to an Identity Provider — the domain becomes selectable in the Authorized Domains section of any OIDC or SAML IdP configuration. See the Generic OIDC and Generic SAML guides.
- Enforce SSO — the SSO Enforced toggle on the domain row becomes available, but only after at least one enabled IdP is bound to the domain.
Enforce SSO for the domain
Once a domain is verified and bound to at least one enabled Identity Provider, the SSO Enforced toggle on the Domains table becomes interactive. The toggle’s tooltip tells you exactly which gating condition (if any) is preventing it from being enabled:
- ON — SSO is enforced: every user on this domain must sign in via SSO. OTP and magic-link login are blocked, with no self-service bypass.
- OFF (available) — the domain is verified and has an enabled IdP, so you can enforce SSO — but it isn’t enforced yet, and users can still use OTP or magic link.
- Grayed out — domain not verified — verify the domain before you can enforce SSO.
- Grayed out — no enabled IdP bound — bind this domain to an enabled Identity Provider (on the SSO page) before you can enforce SSO.
To step back from enforcement without losing any configuration, you have two options:
- Toggle SSO Enforced off on the domain row — users on that domain regain OTP / magic-link login.
- Disable the IdP by turning its Enabled toggle off on the SSO page — this turns enforcement off everywhere the IdP is bound, while preserving all configuration values.
Removing or re-verifying a domain
Deleting a domain from the Domains table removes it from any IdP bindings and is recorded in your audit log. There is no time-based re-verification — once a domain is verified it stays verified until you delete it.
If you need to move a domain to a different organization in Firmly Connect, delete it from the source organization first, then add and re-verify it in the target organization.