
Generic OIDC
Prerequisites
Before you start, make sure you have:
- At least one verified domain in Firmly Connect — see Verify a Domain.
- An OIDC application registered in your IdP that issues an ID token containing the user’s email. You will need its Client ID, Client Secret, and Issuer URL.
- Permission to configure the redirect (callback) URI on your IdP application. Firmly will give you the exact URL to register.
Get the Firmly Callback URL
When you open the OIDC configuration form in Firmly Connect, the page displays a read-only Callback URL with a copy button. This URL is the OAuth2 / OIDC redirect URI that your IdP will send the user back to after authentication.
You must register this exact URL as a permitted redirect URI in your IdP’s OIDC application before the integration will work.

Add an OIDC Identity Provider
Open Settings → Single Sign-On
Navigate to the Single Sign-On page in your Merchant Portal settings.
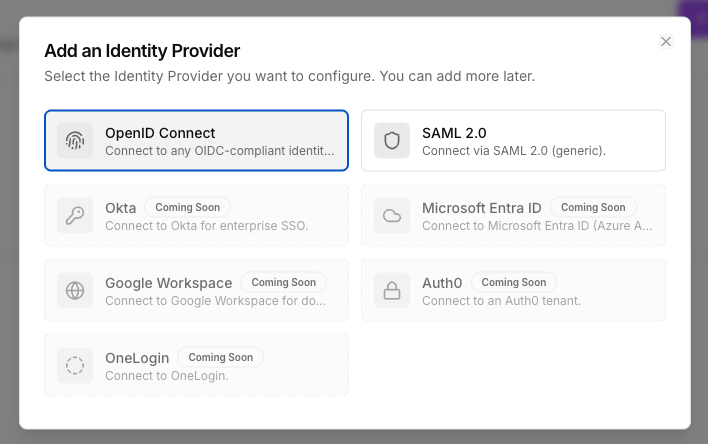
Click Add Identity Provider
The IdP picker dialog opens with all available protocols.
Select OpenID Connect
Click the OpenID Connect tile to open the configuration form.
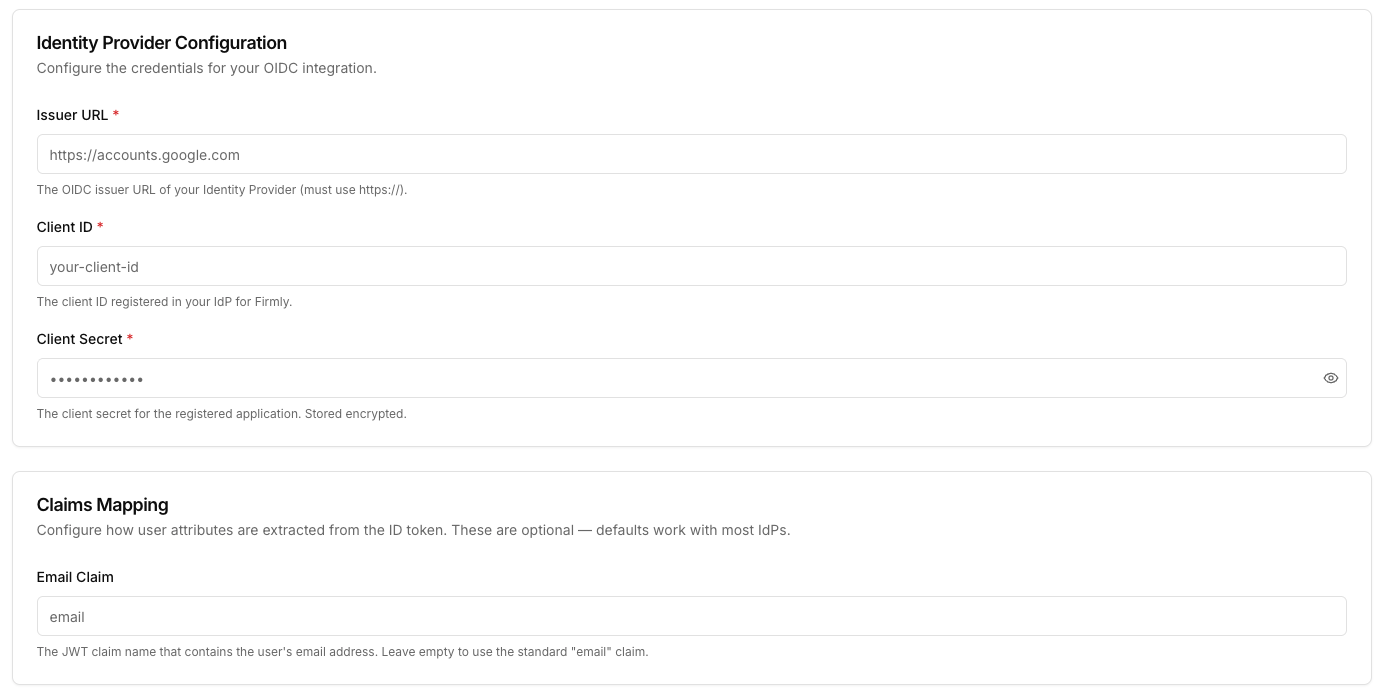
Fill in the form fields
See the Field reference below for every field.
Click Save
The IdP is created in disabled state. You can now test it, bind it to verified domains, and enable it.
Field reference
| Field | Required | What to enter |
|---|---|---|
| Issuer URL | Yes | The OIDC issuer URL of your IdP — must use https:// (for example, https://accounts.google.com). The form accepts either the bare issuer URL or the full …/.well-known/openid-configuration discovery URL; Firmly canonicalizes it on save. |
| Client ID | Yes | The Client ID for the OIDC application you registered in your IdP. |
| Client Secret | Yes | The Client Secret for that application. Stored encrypted; the field is masked with a show / hide toggle. |
| Email Claim | No | The JWT claim name that contains the user’s email address. Leave empty to use the standard email claim — change only if your IdP exposes the email under a non-standard claim name. |
Bind the IdP to verified domains
The IdP configuration form includes an Authorized Domains section listing every domain you have verified. Each verified domain appears as a toggle.
- Turn on the toggle for each domain you want this IdP to handle.
- A single IdP can be bound to multiple domains.
- A single domain can be bound to multiple IdPs (users will be presented with a choice at sign-in).
- At least one domain must be bound before the IdP can be enabled.
Unverified domains do not appear in this list. To bind a new domain to this IdP, verify the domain first — it will then show up here automatically.
Enable the IdP
The Enabled toggle at the top of the form becomes available once:
- All required fields are filled and pass validation, and
- At least one verified domain is bound under Authorized Domains.
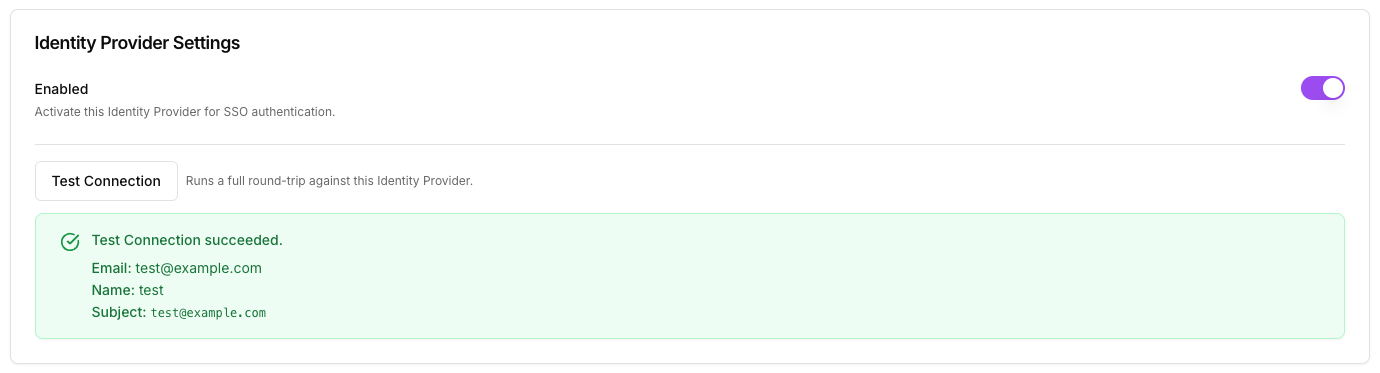
Toggle Enabled on to make the IdP usable for sign-in. A disabled IdP keeps all its configuration but cannot complete authentication for any user.
Test the connection
The Test Connection button appears on the IdP form in edit mode (after the initial save), provided there are no unsaved changes and all required fields are filled.
Clicking Test Connection performs a real OIDC round trip against your IdP:
- Firmly redirects you to your IdP’s authorization endpoint.
- You authenticate with a real account at your IdP.
- Your IdP redirects back to Firmly with an authorization code.
- Firmly exchanges the code for an ID token, validates the signature against your IdP’s JWKS, and extracts the configured claims.
On success, the form displays the extracted claims (email, name, sub). On failure, it displays a formatted error explaining where the round trip broke down (for example, invalid_client, redirect_uri_mismatch, signature verification failure, missing email claim).
Rotate the Client Secret
If you rotate the Client Secret in your IdP (or it leaks and you need to invalidate it):
- Generate a new Client Secret in your IdP application.
- Open the IdP configuration in Firmly Connect, paste the new value into Client Secret, and click Save.
- Run Test Connection to confirm the new secret works.
There is no separate “rotate” workflow — updating the field and saving is the rotation.
Disable or delete the IdP
- Disable — turn the Enabled toggle off on the form. The configuration is preserved, the IdP is removed from sign-in, and any domain enforcement that depended solely on this IdP becomes unavailable.
- Delete — from the IdP row’s actions menu on the SSO page, choose Delete. This is a hard delete, recorded in the audit log, and will unbind the IdP from any domains that referenced it.
Troubleshooting
<issuer-url>/.well-known/openid-configuration must be reachable from Firmly, and its issuer field must match the configured Issuer URL exactly (per OpenID Connect Discovery 1.0 §4.3). If you used a discovery URL in the form, Firmly stores the bare issuer URL after canonicalization — reopen the form to see the stored value.email scope granted, that the user has an email attribute populated in the IdP, and (if the IdP uses a non-standard claim name) set the Email Claim field to the actual claim name.redirect_uri_mismatch (or similar). Copy the Callback URL from the Firmly Connect form verbatim and paste it into your IdP application’s list of allowed redirect URIs. Trailing slashes, scheme (http vs https), and host casing all matter.